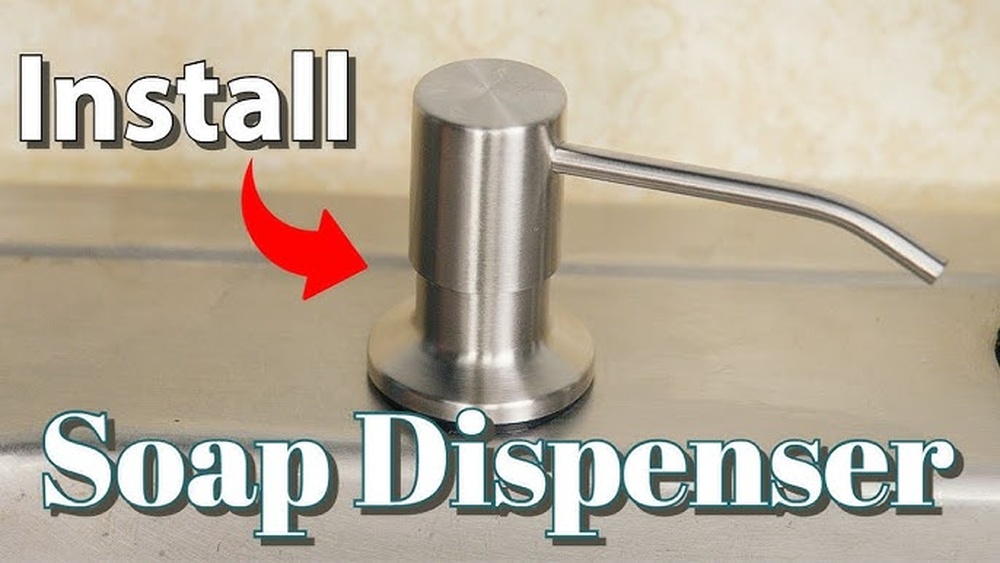
Are you tired of juggling a bottle of soap every time you wash your hands or dishes? Installing a soap dispenser right in your kitchen sink can make your daily routine smoother and your countertop less cluttered.
You might think it’s complicated or that it requires a plumber, but it’s easier than you expect. In this guide, you’ll discover simple, step-by-step instructions to add a soap dispenser to your existing kitchen sink. By the end, you’ll have a sleek, convenient setup that saves you time and keeps your kitchen looking neat.
Ready to upgrade your sink with a handy soap dispenser? Let’s get started!

Credit: www.youtube.com
Contents
Tools And Materials Needed
Installing a soap dispenser in your kitchen sink needs some basic tools and materials. Having the right items makes the job easier and faster. This section lists everything required for a smooth installation.
Essential Tools
Gather these tools before starting. A drill is important for making a hole if one does not exist. A screwdriver helps tighten screws and secure parts. An adjustable wrench is useful to connect the dispenser parts. You will also need a measuring tape to check dimensions. A utility knife is handy for cleaning edges or opening packages. Keep a towel nearby to wipe spills during work.
Choosing The Right Soap Dispenser
Select a dispenser that fits your sink size and style. Check if your sink has a pre-made hole or needs drilling. Pick a dispenser with a bottle size that suits your soap usage. Consider materials like stainless steel or plastic for durability. Look for easy refill designs to save time later. Choose a color and finish that matches your kitchen décor.
Credit: www.lowes.com
Preparing The Sink Area
Preparing the sink area is the first step in installing a soap dispenser. A clean, organized space helps you work faster and avoid mistakes. This preparation makes the installation smooth and safe.
Clearing The Workspace
Remove all items from around the sink. Take away soap bottles, sponges, and dishes. Wipe the sink surface to clear dust and grime. A tidy area prevents accidents and gives you room to work. Keep a towel nearby to catch any water spills.
Measuring For Placement
Decide where the soap dispenser will sit. Most dispensers fit in a hole next to the faucet. Use a tape measure to check the space. Make sure the spot is easy to reach and does not block the faucet. Mark the place with a pencil for drilling. Accurate measuring ensures a perfect fit and avoids damage.
Drilling The Hole
Drilling the hole is a crucial step to install a soap dispenser on your kitchen sink. The hole must be the right size and in the correct spot. This ensures the dispenser fits well and works properly. Careful drilling protects your sink from damage. Preparation and the right tools make this task easier and safer.
Selecting The Drill Bit
Choose a drill bit that matches the soap dispenser’s size. Most dispensers need a hole about 1 to 1.5 inches wide. Use a hole saw drill bit for clean, round holes. If your sink is stainless steel or granite, pick a bit made for hard surfaces. Check the drill bit’s size before starting.
Safety Tips For Drilling
Wear safety goggles to protect your eyes from metal or stone chips. Use gloves to avoid cuts. Secure the sink with clamps or ask for help to hold it steady. Drill slowly and steadily to prevent cracks. Keep the drill bit cool by spraying water if needed. Always unplug the drill when changing bits.

Credit: www.amazon.com
Installing The Soap Dispenser
Installing a soap dispenser in your kitchen sink is a simple way to keep soap handy and reduce clutter. This step-by-step process helps you add convenience without much effort. Follow these clear instructions to fit your new dispenser correctly and securely.
Assembling The Dispenser Parts
Start by unpacking all the dispenser parts. Usually, the kit includes the pump, soap bottle, and mounting hardware. First, attach the pump head to the soap bottle by screwing it tightly. Make sure the pump moves freely and is not stuck. Check for a rubber gasket or washer that helps seal the dispenser to the sink. Place it on the base of the pump to avoid leaks. Keep all parts ready before you move to the next step.
Securing The Dispenser To The Sink
Locate the hole in your sink or countertop for the dispenser. Insert the pump through the hole from the top. From underneath, screw the mounting nut onto the pump’s threaded shaft. Tighten the nut by hand, then use a wrench for a firm fit. Be careful not to overtighten and crack the sink. Attach the soap bottle to the pump from below. Fill the bottle with soap and test the pump by pressing it a few times. Adjust if necessary to ensure smooth operation.
Connecting The Soap Reservoir
Connecting the soap reservoir is an important step in installing your soap dispenser. This part holds the liquid soap and allows it to flow when you press the pump. Proper connection ensures smooth soap delivery and prevents leaks. Follow these simple steps to attach and secure the bottle correctly.
Attaching The Bottle
First, find the soap reservoir bottle that comes with your dispenser. Insert the bottle’s neck into the hole under the sink. Make sure the bottle fits snugly into the space. Screw the bottle into the pump’s connector by turning it clockwise. Tighten it gently but firmly to avoid cross-threading.
Ensuring A Tight Seal
Check the rubber gasket or O-ring on the bottle’s neck. This small part helps create a tight seal between the bottle and the dispenser. If the gasket is missing or damaged, replace it before attaching the bottle. After screwing the bottle in place, push the bottle upwards slightly. This action ensures the gasket seals properly. A tight seal stops soap from leaking under the sink.
Testing The Dispenser
After installing the soap dispenser, it is important to test it. Testing ensures the dispenser works correctly and does not leak. This step helps you avoid messes and wasted soap. Follow simple checks to make sure your new dispenser is ready to use.
Filling With Soap
Start by filling the dispenser with liquid soap. Open the top cap or pump and pour soap slowly. Use a funnel if needed to avoid spills. Fill the container, but leave some space for air. Close the cap tightly to prevent leaks.
Checking For Leaks And Functionality
Press the pump several times to check the soap flow. Watch for soap dripping under the sink or around the dispenser base. Tighten any loose connections under the sink if you see leaks. Make sure soap comes out smoothly with each press. Test the dispenser a few times to be sure it works well.
Maintenance Tips
Proper maintenance keeps your soap dispenser working well. Small efforts help avoid clogs and leaks. Clean and refill regularly for best results. Here are simple tips to maintain your dispenser.
Refilling The Soap
Open the dispenser cap carefully. Use liquid soap made for kitchen use. Pour slowly to avoid spills. Do not overfill the container. Close the cap tightly to prevent leaks. Check the soap level often to refill on time.
Cleaning The Dispenser
Wipe the dispenser surface with a damp cloth. Clean the pump nozzle to stop blockages. Use warm water to rinse inside the container. Avoid harsh cleaners that damage parts. Clean monthly for smooth operation. Dry all parts before reassembling.
Frequently Asked Questions
How Do I Install A Soap Dispenser In My Kitchen Sink?
First, choose a suitable spot on your sink or countertop. Drill a hole if none exists. Insert the dispenser, secure it underneath, and connect the soap bottle. Finally, fill the bottle with soap and pump to test.
What Tools Are Needed To Install A Soap Dispenser?
You need a drill with a suitable bit, screwdriver, adjustable wrench, and plumber’s putty or silicone sealant. These tools help create holes, tighten fittings, and seal the dispenser securely to prevent leaks.
Can I Install A Soap Dispenser Without Drilling A Hole?
If your sink already has a spare hole, you can use that. Otherwise, drilling is necessary to fit the dispenser properly. Avoid installing without a hole, as it may cause instability or leaks.
How Do I Maintain My Soap Dispenser After Installation?
Regularly clean the pump and nozzle to prevent clogging. Refill the soap bottle before it runs empty. Occasionally, check for leaks and tighten fittings if needed to ensure smooth operation.
Conclusion
Installing a soap dispenser in your kitchen sink is simple and quick. Follow each step carefully to avoid mistakes. Use the right tools and materials for a secure fit. Enjoy easier hand washing and less clutter around the sink. Small changes like this make your kitchen more functional.
Try it yourself and see the difference today.