
Installing a kitchen sink drain may appear daunting, but with the correct products and instructions, it can be an easy do-it-yourself job. I will guide you step-by-step through how to install a kitchen sink drain so you will ensure you have all the information to successfully and correctly complete the task. Regardless, by following these tips, you will avoid common mistakes and have a successful (the first time) installation, whether it is new or replacement.
Prepare by gathering the tools and materials you will need. You will need a plumbing wrench, plumber’s tape, a bucket, a new sink drain assembly, and silicone sealant. Everything should be handy to avoid disruption and make the procedure easier.
First, remove the current drain. To catch any remaining water, set a bucket under the sink. Then, with your wrench, loosen the nuts, fastening the drain pipes. Remove the old drain, then clean the area thoroughly to allow for a proper seal for the new installation.
Now it’s time to install your new kitchen sink drain. Apply a bead of silicone sealant around the drain opening in the sink. Please insert the new drain assembly into the opening and secure it with the included nuts. If you screw it tightly, it must stop leaking.
When the drain is outfitted, reattach the plumbing. Connect the P-trap and any other drain pipe so that all connections are tight. Apply the plumber’s tape to create a watertight seal at threaded joints.
Run water through the sink last to find leaks. If you notice any, tighten the connections as needed. Follow these simple rules that will guide you how to install a kitchen sink drain properly today. Besides saving money, this DIY project builds your plumbing skills for future renovations in the house. joyful plumbing.
Contents
Complete Guide How to Install a Kitchen Sink Drain
Homeowners need to know how to install a kitchen sink drain as a vital task, especially when it comes to DIY chores. A well-installed drain prevents leaks, thus ensuring correct water flow and saving costly repair costs. Here’s everything you need to know about faucet how to install a kitchen sink drain. We will provide step-by-step instructions to make the process as easy as possible, whether installing a new drain or replacing an old one. Required tools and some time should be enough for you to complete this plumbing project yourself. This will improve your plumbing skills and increase your satisfaction with completing a home repair project. First, the tools and supplies you will need.
Tools and Materials Needed
Before beginning your kitchen sink drain installation project, you should gather all the tools and supplies. This preparation will show you how to streamline the activity and make it more productive. You will need the following:
1.Plumbing Wrench: The nuts securing the drain pipes need a plumbing wrench to loose and tighten them.
2.Bucket: Keep a bucket near you to catch any water leaking when the old drain is pulled.
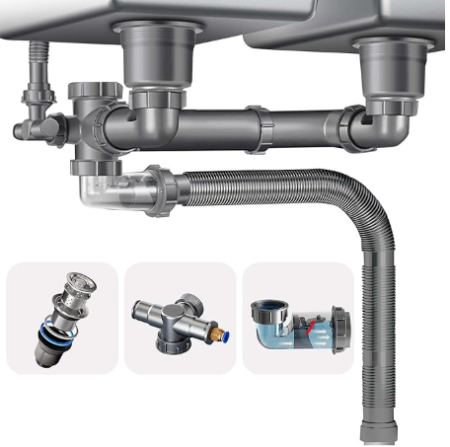
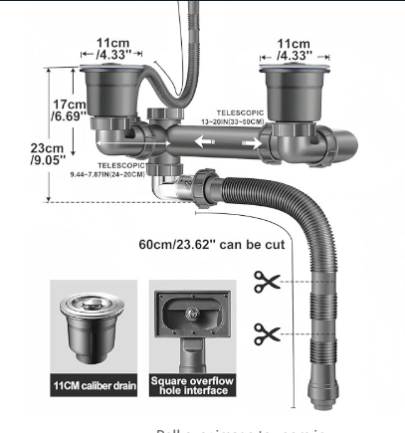
3.New Sink Drain Assembly: Be sure to purchase a matching drain assembly based on your sink type.
4.Silicone Sealant: Silicone sealant provides a watertight seal around the drain.
5.Plumber’s Tape: This can prevent leaks in plumbers’ tape on threaded joints.
Before proceeding, ensure that you have these tools conveniently available. Not only does this readiness save time, but it also helps ward off installation-related frustration. There are things you need to know beforehand about your needs to feel more confident as you work on the kitchen sink drain install.

Preparation Steps
Proper planning hugely impacts a sound kitchen sink drain installation. Follow these guidelines to ensure smooth operations:
1.Turn Off the Water Supply: To cut off any water flow for the installation, locate the shut-off valves underneath the sink and turn them off before you begin.
2.Clear the Workspace: Remove everything from under the sink to create an open space where you can easily plug in tools and the plumbing.
3.Gather Safety Gear: Leather gloves and safety eyewear can help you avoid sharp edges and trash while you work.
4.Examine Existing Plumbing: Take a little time to review the existing layout. These connections will guide you when removing and installing.
These types of proactive moves help you win. Having a clear intention and a clean work area will greatly assist in keeping the installation process more organized and efficient.
Step-by-Step Installation Guide
While learning how to install a kitchen sink drain may seem intimidating, if you follow the steps below, you can tackle this job confidently. Use these instructions step by step to complete your installation.
Step 1: Remove the Old Drain
Remove the old drain assembly. Use an adjustable wrench to loosen the nuts that connect the drain to the sink. You will want to put a bucket under to catch any remaining water. After all connections are loose, gently take out the drain assembly.
Step 2: Prepare the New Drain
Grab your new sink drain, then smear a lot of plumber’s putty around the drain flange. This is vital in achieving a water-tight seal. Insert the drain flange into the hole in the sink and push down hard.
Step 3: Attach the Tailpiece
After tightening the drain flange, you can connect the tailpiece to the drain assembly. Ensure that the tailpiece fits tightly into the drain flange. Adjust the wrench to the size of your connection and make it snug, but do not over-tighten it, as this could crack the connections.
Step 4: Attach the Drainage Pipe
Connect the tailpiece to the P-trap. Put the pipes in alignment and apply Teflon tape on the threads to avoid leakage. Tighten the fittings firmly, but do not overtighten again. Create a Backup.
Step 5: Secure All Connections
Check each connection and make sure everything is sufficiently tightened. First, double-check your work — leaks can form from loose connections.
Step 6: Test for Leaks
Go ahead and turn the water supply back on, and ensure the drain is running some water through it. Notice if there are any leaks around the connections. If you see any water leaking out, stop the water and make adjustments as needed.
Follow these steps, and you will successfully install your kitchen sink drain. Remember that you can achieve a successful DIY project with patience and close attention to detail. Feel free to check back here for troubleshooting advice if things go wrong.
Common Issues and Troubleshooting
Even with stellar installation techniques, issues can arise. If you know these, you will be able to deal effectively with everyday problems.
1.Leaking Connections: Leaking at the connection points is one of the most common problems. If you see water collecting around any joints, first check that all connections are secure. If the problem persists, remove the affected area and re-apply Teflon tape or the plumber’s putty. Just be sure the surfaces are clean before reassembling.
2.Slow Draining: If the water drains slowly, this may indicate a clog in a pipe. If there is any garbage, inspect it and remove the P-trap. Regular cleaning and maintenance can help prevent clogs down the road.
3.Unpleasant Odors: If you inhale bad smells from your sink, it might be food trash lodged in the drain or a dry P-trap. Check that your P-trap contains water; consider pouring vinegar and baking soda down the drain to eliminate odors.
Being prepared for these common issues can save you time and frustration. Regular maintenance and checking of your kitchen sink drain will ensure you run for years under proper working conditions.
Maintenance Tips
Once your kitchen sink drain is installed, proper maintenance is key to maximizing its lifespan and efficiency. However, these ideas may keep your drain in top condition.
Regular Checks: Periodically inspect all the connections for any signs of leaks or wear. Fix broken parts immediately and tighten loose fittings to prevent more serious issues later.
Clean the Drain: Draining hot water on your sink frequently will prevent blocking. If you have greasy buildup, you can use vinegar and baking soda to battle the buildup if you want a more intense cleaning.
Avoid Harsh Chemicals: Avoid using harsh chemicals, though, which are tempting, such as chemical drain cleaners, because, over time, they can deteriorate your plumbing. Instead, opt for natural cleaning methods, or — when a lousy clog occurs — seek the help of a professional.
Make It Plain: Don’t pour grease, coffee grounds and fibrous foods down the drain. This drugs, and other plumbing issues, can get clogged.
So, following these maintenance tips will allow you to make sure that the drains in the kitchen sink to work properly, and you do not have to spend a fortune on repairs while your kitchen keeps running.
FAQ:
- What tools and materials do I need to install a kitchen sink drain?
To install a kitchen sink drain, you’ll need these tools and materials:
Tools: Bucket, Phillips and flathead screwdriver, adjustable wrench, towels.
Materials: sink drain assembly (basket strainer, tailpiece); plumber’s putty or silicone sealant; Teflon tape; P-trap; drain pipes, metal or PVC).
Preparation means a smoothly running installation.
2. Will I require silicone sealant or plumbers’ putty for installation?
Both plumber’s putty and silicone sealant are frequently used to create a watertight barrier between the sink and the drain flange. Although silicone sealant is a tough option that will hold up in high-moisture environments, plumber’s putty is easier to work with and is usually preferred because of its flexibility. Choose the single closest match to your project specifications.
- How do I stop leaking after the kitchen sink drain installation?
Correctly applying the plumber’s putty or silicone sealant around the drain flange will prevent leaks.
To make threaded connections watertight, apply Teflon tape.
Check all hoses and connections to make sure they are snug but not overtightened. After Installation, Test for leaks by running water through the sink and, if necessary, fixing any loose connections.
- How long does it take to install a kitchen sink drain?
The normal time for installing a kitchen sink drain is one to two hours. How long this takes will depend on your experience level and whether you are fixing an old drain or a new sink. Proper preparation and the availability of all supplies will greatly speed up the process.
5.Can I install the kitchen sink drains myself without a professional?
Most houses can , in fact, handle this do-it-yourself job: installing a kitchen sink drain. You can finish the installation yourself if you have the right tools, materials, and a step-by-step guide. Still, if you’re reluctant or encounter particularly tricky plumbing issues, it’s always worth consulting with a professional plumber.
6.What are some common problems after installing a kitchen sink drain, and how can I fix them?
Typical problems involve:
Check for loose or improperly sealed connections and tighten those.
It can help you see what you will clear from this checkup on removing the P-trap or drain pipes.
Not To Do: Leave your P-trap empty, which can cause unpleasant smells to haunt your workplace, and neglect to clean your drain regularly.
If you follow the correct installation and maintenance procedures, you will avoid these issues in the future.
Conclusion
The basics of plumbing: Installing sink drain, though satisfying as a do-it-yourself job that functions effectively in your house and gives you practical plumbing knowledge, installing a kitchen sink drain is not simple. By following the extensive recommendations in this book, you’ll likely be less subject to common errors and can complete the process. From ordering the necessary materials to finishing each part of the installation, a systematic approach is a prerequisite for a waterproof and effective drain system.
A good kitchen sink drain installation will not only prevent embarrassing leaks but also ensure that the water flows perfectly to avoid clogs and bad odors. Regular maintenance—such as cleaning and leak inspections—will prolong the life of your drain and help your kitchen operate seamlessly. Don’t throw food scraps and oil down the drain, as they can lead to blockages and costly repairs.
However, if you discover leaks or drainage issues after installation , please refer back to the troubleshooting tips provided. As time goes by, insatiably tightening loose connections or cleaning small obstructions can help you save time and effort when being proactive.
As you gain confidence in your plumbing skills, you may also be doing increasingly more house repair jobs. Every tutorial you go through through this installation will serve as a reference for your following do-it-yourself projects, thus allowing you to take on even more challenging tasks at home.
In the end, how to install kitchen sink drain , drain is a helpful skill and a relatively inexpensive solution that gives you more control over household maintenance. Instead of seeking instant gratification, embrace that instant gratification that comes from completing a do-it-yourself job, and enjoy a fully functional kitchen sink. Comment with your experiences; don’t hesitate to reach out if you have questions. With the right approach and patience, you’re only a few steps away from professional-level results in the comfort of your own home. Happy plumbing.
All in all, putting in a kitchen sink drain is an acceptable do-it-yourself project that will enhance the plumbing system in your home. By following the guidance in this book, you will be well-acquainted with how best to approach this work with confidence. Remember to prepare your workplaces, collect the necessary tools and materials, and conduct all steps correctly.
Check the troubleshooting section for guidance if you encounter any issues during installation. The best way to spare yourself further problems is by avoiding them; therefore, get into the habit of weekly inspection and cleaning of your sink drain.
Enjoy the satisfaction of doing this yourself. Post comments with questions or share experiences—don’t be shy. Good plumbing!