
Thinking about replacing your kitchen sink? Before you rush out to buy a new one, there’s one crucial step you can’t skip: measuring your current sink accurately.
Getting the measurements right saves you time, money, and the headache of dealing with ill-fitting sinks. In this guide, you’ll learn simple, clear steps to measure your kitchen sink perfectly. By the end, you’ll feel confident choosing the right replacement that fits your space and style without any guesswork.
Keep reading to avoid costly mistakes and make your kitchen upgrade smooth and stress-free.

Credit: www.homedepot.com
Contents
Tools Needed
Measuring a kitchen sink for replacement needs some basic tools. These tools help get accurate sizes. Accurate measurements ensure the new sink fits perfectly. Prepare all tools before starting. This saves time and avoids mistakes.
Measuring Tape
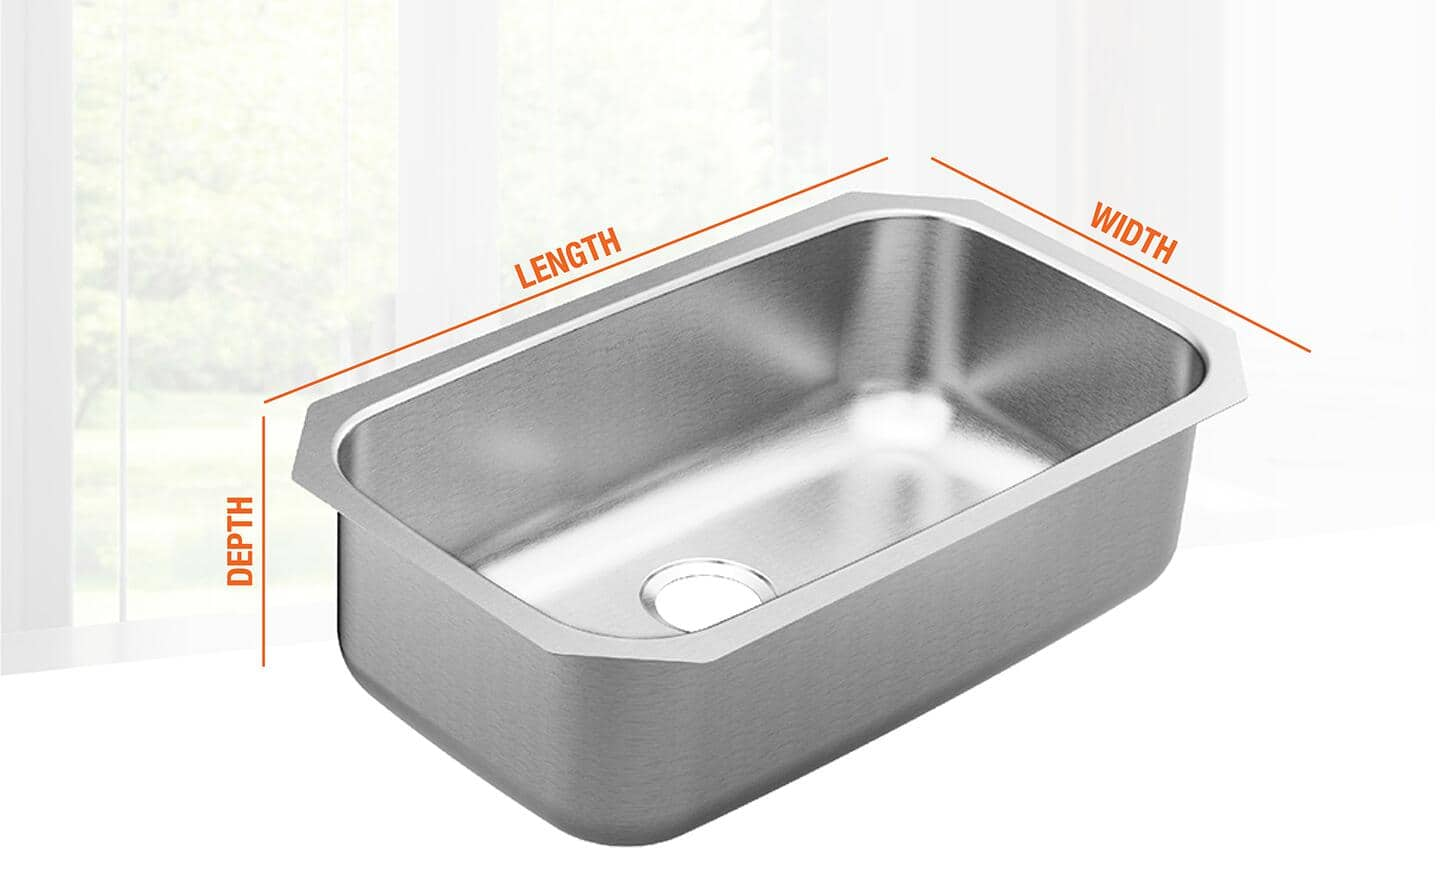
A measuring tape is the main tool for this job. Use it to measure the length and width of the sink area. Also, measure the depth of the sink bowl. Choose a tape that is easy to read and flexible.
Pencil And Paper
Write down all measurements clearly. Use a pencil to mark the tape or the sink edges. This helps keep track of numbers. A paper note keeps measurements safe until installation.
Level
A level checks if the sink surface is flat. This tool helps avoid water pooling in the sink. Place it on the sink edge or countertop. Adjust measurements if the surface is uneven.
Flashlight
A flashlight helps see dark areas under the sink. It is useful for checking plumbing and tight spots. Good lighting avoids missing hidden details during measuring.
Types Of Kitchen Sinks
Choosing the right kitchen sink starts with knowing the types available. Each sink style fits different kitchen needs and spaces. Understanding these types helps measure and pick the perfect sink for replacement.
Top-mount Sinks
Top-mount sinks, also called drop-in sinks, sit on top of the countertop. Their edges rest on the counter surface. They are easier to install and replace. Measuring must include the outer rim for a proper fit.
Undermount Sinks
Undermount sinks are installed below the countertop. They create a smooth look and make cleaning easier. Precise measurements of the sink bowl and countertop cutout are essential. The sink edges are hidden under the counter.
Farmhouse Sinks
Farmhouse sinks have a deep basin and a front apron. These sinks extend past the counter edge. Measuring requires attention to the front and the cutout size. They suit kitchens with a rustic or country style.
Single Vs. Double Bowl Sinks
Single bowl sinks offer one large basin. Double bowl sinks have two separate basins. Measuring for double bowls involves checking the width and divider space. Choose based on your kitchen tasks and space.
Measuring Sink Length
Measuring the length of your kitchen sink is a key step before replacement. This ensures the new sink fits perfectly into your countertop. Accurate length measurement helps avoid costly mistakes and installation issues.
Use a tape measure for this task. Measure from one outer edge to the other. This gives the total sink length. Double-check the measurement for accuracy.
Measure The Sink’s Outer Edges
Place the tape measure at the outer edge of the sink. Stretch it straight across to the opposite edge. Record this number as the sink length.
Measure Inside The Sink Basin
Measure the length inside the sink basin from one inner edge to the other. This helps if you want to know the usable space inside the sink.
Consider The Sink’s Mounting Type
Identify if your sink is drop-in or undermount. Drop-in sinks usually have a visible lip, affecting length measurement. Undermount sinks sit below the countertop, so measure carefully.

Credit: www.wikihow.com
Measuring Sink Width
Measuring the width of your kitchen sink is a key step before buying a replacement. The width tells you how wide the sink is from one side to the other. This helps ensure the new sink fits perfectly in your countertop space.
Take your time with this step. Accurate width measurements prevent problems during installation. It also helps you pick a sink that looks balanced with your kitchen design.
Gather The Right Tools
Use a tape measure for the best results. A metal tape measure works well because it stays straight. Have a notepad or phone ready to write down the numbers.
Measure The Sink Basin Width
Start by measuring the inside of the sink basin. Place the tape at the far left inside edge. Stretch it straight across to the far right inside edge. This gives you the basin width, the space inside the sink where water sits.
Measure The Overall Sink Width
Next, measure the entire sink width from outside edge to outside edge. This includes any rim or lip that rests on the countertop. This number shows how much countertop space the sink covers.
Double Check Your Measurements
Measure twice to avoid mistakes. Small errors can cause big fitting problems. Write down both the basin and overall widths clearly for easy reference.
Measuring Sink Depth
Measuring the sink depth is a key step in replacing your kitchen sink. It ensures the new sink fits well and works properly with your cabinet space. Depth affects how much water the sink can hold and how comfortable it feels to use.
Sink depth means the distance from the top edge to the bottom of the basin. Accurate measurement helps avoid buying a sink that is too deep or too shallow.
How To Measure Sink Depth
Use a tape measure or ruler for this task. Place one end at the top inner edge of the sink. Stretch the tape straight down to the bottom of the basin. Note the number in inches or centimeters.
Measure Multiple Points
Measure the depth at several spots inside the sink. Some sinks have a sloped bottom or uneven surfaces. Record the smallest depth to ensure the sink fits well.
Consider Cabinet Space
Check the cabinet below the sink. Measure the space from the cabinet bottom to the countertop. Make sure the sink depth fits this space without blocking pipes or shelves.
Record And Compare
Write down the depth measurements clearly. Compare them with the new sink’s specifications. Choose a sink with a depth close to or slightly less than your current sink.
Credit: www.homedepot.com
Checking Faucet And Drain Locations
Checking the faucet and drain locations is a key step in measuring your kitchen sink for replacement. These parts affect how the new sink fits and works with your plumbing. Measuring them carefully saves time and effort during installation.
Start by noting the position of your faucet. Some sinks have the faucet mounted on the sink itself. Others have it installed on the countertop or wall. Knowing this helps you pick a sink that fits your setup.
Next, check the drain location. It can be centered or offset to one side. Measure the distance from the back of the sink to the center of the drain hole. This ensures the new sink matches your existing plumbing.
Measuring Faucet Mounting Holes
Count the number of holes in the sink for the faucet. They can be one, two, three, or four holes. Measure the distance between these holes if there is more than one. This helps you find a sink with the right hole pattern.
Locating Drain Position
Find the drain hole on your current sink. Use a tape measure to find the distance from the back edge to the center of the drain. Write down this number. It guides you in choosing a sink with a matching drain location.
Checking Compatibility With Plumbing
Compare your measurements with the new sink’s specs. Make sure the drain and faucet holes line up with your plumbing. This avoids extra work or buying new pipes during installation.
Measuring The Countertop Cutout
Measuring the countertop cutout is a key step in replacing a kitchen sink. This measurement tells you the exact size of the hole where the sink will sit. Getting this right helps you find a sink that fits perfectly without gaps or overhangs.
Take your time to measure carefully. Small mistakes can cause big problems during installation. Use a tape measure and note down each dimension clearly.
Measuring The Width And Length Of The Cutout
Start by measuring the width of the countertop cutout from one edge to the other. Measure at the widest points to capture the exact size. Then, measure the length from front to back. Write down both numbers for reference.
Checking The Shape Of The Cutout
Look closely at the shape of the cutout. Some cutouts are rectangular, while others have rounded corners. Note any curves or unusual shapes. This detail helps you choose a sink that fits well.
Measuring The Depth Of The Cutout
Measure the thickness of the countertop around the cutout. This depth affects how the sink will fit and sit on the counter. Record this measurement to ensure compatibility with your new sink.
Verifying The Measurements
Double-check all measurements. Measure each dimension twice for accuracy. Confirm your notes before buying a new sink. Accurate measurements save time and prevent errors.
Recording Measurements Accurately
Recording measurements accurately is crucial when replacing a kitchen sink. Precise data ensures the new sink fits perfectly without extra work. Small mistakes can cause big problems during installation. Taking careful notes saves time and money.
Use a reliable tape measure for all dimensions. Double-check every number before writing it down. Clear and organized notes help avoid confusion later. Label each measurement clearly for easy reference.
Measure The Sink’s Length And Width
Start by measuring the sink’s length from edge to edge. Then measure the width across the widest part. Write these numbers down immediately. Use inches or centimeters consistently throughout.
Record The Depth Of The Sink
Measure the sink’s depth from the top edge to the bottom. This helps match the new sink’s bowl size. Note this measurement carefully to avoid errors.
Note The Position Of Faucets And Drains
Measure the distance from the edges to the faucet holes. Also, record where the drain is located. These details affect plumbing and sink placement. Mark these positions clearly in your notes.
Use A Sketch For Better Clarity
Draw a simple sketch of the sink with measurements. Label each part to avoid mix-ups. A visual helps remember details and guides the installer well.
Choosing The Right Replacement Sink
Choosing the right replacement sink is a key step in your kitchen upgrade. The sink should fit your space and match your cooking needs. Picking the correct size, style, and material helps avoid problems later. It also improves your kitchen’s look and function.
Measure Your Current Sink Space
Start by measuring the width, length, and depth of the existing sink space. Use a tape measure for accuracy. Note the size of the cutout in the countertop. This ensures the new sink fits perfectly without extra cuts or gaps.
Select The Sink Style
Decide on the sink style that suits your kitchen. Options include drop-in, undermount, farmhouse, and integrated sinks. Each style changes the look and installation method. Choose one that matches your countertop and kitchen design.
Choose The Right Material
Pick a material that lasts and looks good. Stainless steel is popular for its durability and easy cleaning. Composite granite offers a modern look and resists scratches. Porcelain and cast iron provide classic styles but need careful upkeep.
Consider The Number Of Bowls
Think about how many bowls you need. Single bowls offer more space for washing large pots. Double bowls help separate tasks like washing and rinsing. Triple bowls are rare but useful in busy kitchens.
Check The Faucet And Accessories Compatibility
Make sure the new sink works with your faucet and accessories. Note the number of faucet holes and their size. Some sinks come with pre-drilled holes, while others do not. Match these to your current setup for easy installation.
Frequently Asked Questions
How Do I Measure My Kitchen Sink For Replacement?
Measure the length and width of your existing sink’s top rim. Note the depth from the rim to the bottom. Include faucet holes if present. This ensures your new sink fits perfectly into the countertop and aligns with plumbing.
What Tools Do I Need To Measure A Kitchen Sink?
You need a tape measure, a pencil, and paper. A level may help check evenness. These tools help capture accurate dimensions for a proper sink replacement.
Should I Measure The Countertop Or The Sink For Replacement?
Measure both the sink and the countertop cutout. The countertop size ensures the new sink fits well. Sink measurements confirm the basin size and depth meet your needs.
How To Measure Faucet Holes On A Kitchen Sink?
Measure the distance between faucet holes center-to-center. Count the total number of holes. This helps select a compatible faucet and avoid installation issues.
Conclusion
Measuring your kitchen sink is simple with the right steps. Always use a tape measure and note width, length, and depth. Double-check your numbers before buying a new sink. Knowing these details helps you find the perfect fit. Avoid mistakes that cause installation problems.
Take your time and measure carefully. This small effort saves money and time later. Now, you can replace your kitchen sink with confidence.