
If you want to learn how to put in a kitchen sink drain , you are in the right place! One such easy task that can help you cut down on expert plumbing services is the kitchen sink drain installation. Whether you just want to fix a leaky bathroom or if you’re a DIY addict, this step by step tutorial will give you all the info you need. With the right tools and some determination, you can install your kitchen sink drain in no time, and have a fully functional sink.
Before you begin, ensure you have all the supplies you will need. A kitchen sink drain kit, plumber’s tape, silicone sealant and adjustable wrenches are needed. Once you have these items available, please follow the instructions carefully to ensure a successful installation. Properly cleaning the sink area and removing the old drain (if replacing) are typically the first steps in the process. Once the area has been prepped, the first step in installing it, is to position the new drain over the sink’s drain hole. Install silicone sealant where appropriate and tune the fittings tightly to ensure the links are well sealed and do not leak.
One of the most common mistakes when learning how to put in a kitchen sink drain is ignoring that alignment until it is too late and everything is locked in tight. More plumbing problems such as leaks or poor drainage can result from misalignment. After the installation, run some water through the drain to check for leaks. Assuming everything is sealed correctly, draining your sink should work easily and well.
Contents
How to Put in a Kitchen Sink Drain : Essential Tools and Materials for Success
One of the most crucial plumbing chores homeowners can usually undertake is installing a kitchen sink drain. Knowing how to install a kitchen sink drain saves professional installation costs and gives you functional do-it-yourself abilities. Essential for any kitchen operation, a correctly installed drain guarantees smooth water flow and stops leaks. We will walk you through the installation process in this all-inclusive guide so that you have all the knowledge required to do the work satisfactorily. This book will provide the tools and methods to produce a professional outcome whether your kitchen is being renovated or just an old drain is being replaced.
Materials and Tools Needed
Before beginning the installation process, it is very important to gather all the tools and supplies. This preparation will make installation easier and ensure that you have everything on hand at all times. You’ll need the following:
Essential Materials
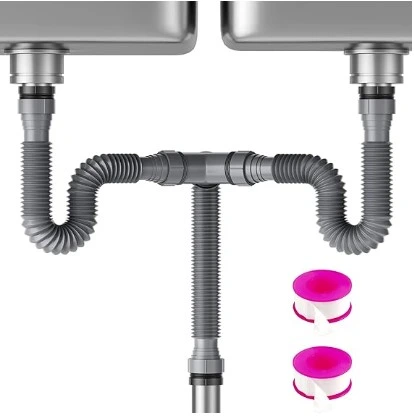
- Kitchen Sink Drain Kit: Kit Kitchen Sink DrainUsually includes the drain body, strainer and locknut—all required for the actual installation
- Plumber’s Putty or Silicone Sealant: Both are used together to create a watertight seal between a sink and drain.
- Locknut: This secures the drain assembly underneath a sink.
- P-Trap: This is the part of the plumbing system of every sink and it is called a P-Trap, P trap looks like a pipe and this pipe is the part that connects the sink drain to the whole plumbing system of the house and stops the sewer gasses from entering your house.
Necessary Tools
- Wrench: Nuts and fittings need real tightening, to get that you can’t do without wrenches.
- Screwdrivers: A screwdriver is very useful to fasten components or make some changes.
- Bucket: To collect any leaking water during the installation.
- Towels or Rags: Towels or rags assist to maintain a dry work area and to wipe up spillage.
As so, having all of this bite and supplies on hand will make your installation faster and more problem free. Understanding how to use each tool will also allow you to troubleshoot any issues that arise during the installation.
Step-by-Step Instructions
Step 1: Prepare the Sink
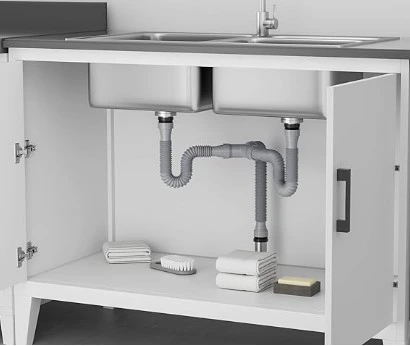
First, clean the area around your sink. Throw away any old plumbing fittings and ensure that the sink hole is clean. We close in on the second stage, which is critical to achieving a good seal on it to stop any leaks in the future.
Step 2: Install the Drain Assembly
Retrieve the drain body from your kit and apply a generous bead of plumber’s putty to the outer rim. Pressing down firmly to create a seal, slide the drain down the sink hole. Drain centering and levelness will greatly impact drainage and water flow.
Step 3: Secure the Drain
From underneath the sink, lay the locknut over the drain body. It’s a good tight, but make certain you do don’t make it too tight since a drain assembly or sink could be damaged.
Step 4: Connect the P-Trap
Secure the P-trap to the drain. Ensuring that the trap is correctly aligned with the drain and secured with the appropriate fittings will help with this. If leaks are to be avoided, every connection must be well sealed.
Step 5: Test for Leaks
Once everything is connected, turn on the water and run it through the sink to search for leaks. If you notice any, tighten the connections at the source of the smell as needed until a secure seal is achieved.


Common Mistakes to Avoid
Install a kitchen sink drain with knowledge of frequent errors that could cause problems later on. These are some traps to stay clear of:
- Using Too Much or Too Little Plumber’s Putty: Applying too much or too little plumber’s putty can cause a mess and result in overflow or leakage respectively.
- Neglecting to Clean the Area: Ignoring to clean the sink area before installation could result in poor adhesion and leakage. Make sure the new drain runs on a smooth, spotless surface always.
- Not Securing Connections Properly: Many leaks start from loose connections. While all nuts and fittings should be tightened firmly, avoid overtightening as this could harm the components.
- Installing the Drain at an Angle: Effective water flow depends on the drain’s being properly aligned. Check the drain to be level to avoid leaks and problems.
- Skipping the Leak Test: Ignoring the Leak Test Run water through the sink always to look for leaks following installation. Finding any problems before they become significant ones depends on this stage.
Conclusion
Installing a kitchen sink drain is a skill every homeowner or do-it-yourselfer needs. Learning how to put in a kitchen sink drain can save you a lot of money on plumbing costs and give you confidence in your home repair abilities. Having the proper equipment and supplies will help make the process simple and rewarding.
Essentially, the installation begins with compiling basic instruments such as a wrench, screwdrivers, pliers, a bucket, and towels. Accessing those tools will simplify installation, as they can help troubleshoot issues. The right tools are also essential—a quality installation will require a kitchen sink drain kit (about $25), a plumber’s putty or silicone sealant, a locknut, and a P-trap. Ensuring these elements are compatible with your sink can prevent issues.
Detailed instructions will help you avoid the common mistakes that lead to leaks or drainage issues as you complete the installation. Always clean the area thoroughly before starting, use the plumber’s putty correctly for a waterproof seal, and check after installation for leaks.
By prepping everything in life, you will not only run your kitchen better but also play a part in preserving the life of your plumbing system by planning and understanding the process beforehand. It is also a great do-it-yourself project, given that it can teach you skills for house repair later on.
Finally, do not hesitate to ask for help and share your experiences when challenges arise. Registering for the do-it-yourself universe can result in clear-eyed analysis and pep talks. Regardless of your experience with do-it-yourself projects or plumbing, kitchen sink drain installation is the only time you can still receive a good or bad job with correct planning and technique. Do-it-yourself plumbing; enjoy your new sink drain!
Frequently Asked Questions (FAQs)
- What are the first steps in learning how to put in a kitchen sink drain?
First gather all required tools and supplies before learning how to put in a kitchen sink drain. This covers a kitchen sink drain kit, plumbers’ putty, a wrench, and a bucket. Reading guidelines or viewing instructional videos will help you to become familiar with the installation process.
- How long does it take to put in a kitchen sink drain?
Usually, depending on your degree of expertise with plumbing chores, installing a kitchen sink drain takes one to two hours. Ahead of time tool and material preparation helps you to simplify the process and finish the installation more quickly.
- What materials do I need to put in a kitchen sink drain?
A kitchen sink drain kit (includes drain body, strainer, and locknut)
Plumber’s putty or silicone sealant for sealing
- Can I put in a kitchen sink drain myself, or should I hire a professional?
Indeed, you can absolutely empty a put in a kitchen sink drain yourself! Many homes owners effectively finish this chore as a do-it-yourself project with the correct materials and directions. If you’re not confident about the procedure.
- What indicators show that I have installed in a kitchen sink drain successfully?
Run water through the sink following installation to look for leaks. You have effectively put in a kitchen sink drain if the water drains without any indication of connection leaks. To make sure everything is safe, keep a few minutes of observation on it.
- Should leaks develop following the kitchen sink drain installation, what should I do?
Should leaks arise following installation, first make sure all connections are tightened correctly. Should leaks continue, you could have to disassemble the drain and add silicone sealant or plumber’s putty for a better seal.