Are you ready to tackle a kitchen project that can save you time and money? Removing your kitchen sink might sound tricky, but with the right steps, you can do it yourself confidently.
Imagine having the freedom to upgrade or fix your sink without waiting for a plumber. In this guide, you’ll discover simple, clear instructions that make the process straightforward. Keep reading to unlock the secrets to removing your kitchen sink safely and easily your kitchen transformation starts here.
Contents
Tools And Materials Needed
Removing a kitchen sink requires some basic tools and materials. Having the right items makes the job easier and safer. Prepare these tools before starting to save time and avoid frustration.
Each tool plays a specific role during the removal process. Some help loosen pipes, others protect surfaces, and some ensure safety. Let’s explore what you need.
Wrench And Pliers
A wrench loosens nuts and bolts holding the sink in place. Pliers grip and twist pipes or small fittings. These tools work together to disconnect plumbing parts smoothly.
Screwdrivers
Use a flathead or Phillips screwdriver to remove screws from sink clips or brackets. Screwdrivers help detach the sink from the countertop securely.
Bucket And Towels
A bucket catches water left in pipes or the sink basin. Towels clean spills and protect the floor. Both keep your workspace dry and tidy.
Utility Knife
This knife cuts through caulk or sealant around the sink edges. It helps separate the sink from the countertop without damage.
Putty Knife
Use a putty knife to pry the sink gently from the countertop. It also removes old putty or adhesive residue after removal.
Flashlight
A flashlight brightens dark areas under the sink. It helps spot connections and tight spaces clearly during removal.
Safety Gear
Wear gloves to protect your hands from sharp edges or chemicals. Safety glasses shield your eyes from debris or splashes.

Credit: www.youtube.com
Prepare The Workspace
Preparing the workspace is the first step to safely removing your kitchen sink. A clean, organized area helps you work faster and avoids damage to your kitchen. Taking time to prepare also keeps tools and parts in reach. This preparation makes the sink removal process smoother and less stressful.
Turn Off Water Supply
Locate the water valves under the sink. Turn both the hot and cold water valves clockwise to stop water flow. Double-check by turning on the faucet to ensure no water comes out. This step prevents leaks and water damage during removal.
Clear The Area
Remove all items from under the sink and nearby countertops. Clear the workspace to avoid obstacles while working. Keep tools and supplies close but out of the way. This keeps the area tidy and reduces the chance of accidents.
Protect Cabinets And Floor
Place old towels or cloths inside the cabinet to catch drips. Lay a drop cloth or cardboard on the floor to protect it from scratches and spills. These coverings shield surfaces from damage and make cleanup easier after the job.
Disconnect Plumbing
Disconnecting the plumbing is a key step in removing a kitchen sink. It stops water flow and clears connections. This step makes the removal safe and smooth. Follow these clear tasks to disconnect plumbing without trouble.
Remove Drain Pipes
Start with the drain pipes under the sink. Place a bucket below to catch any leftover water. Unscrew the slip nuts that hold the pipes together. Carefully pull the pipes apart and set them aside. Check for any clogs or debris while pipes are off.
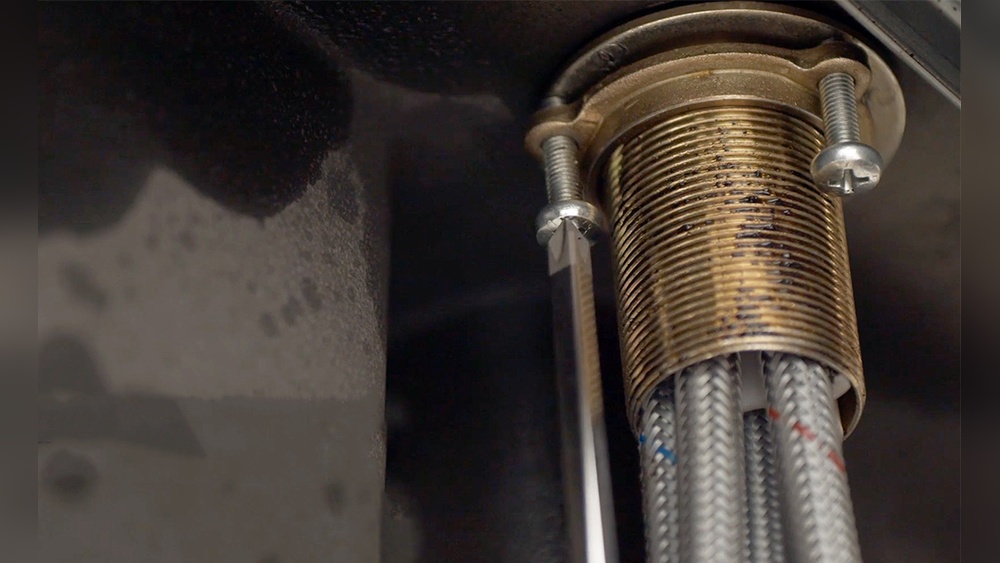
Detach Water Supply Lines
Next, turn off the water valves under the sink. Use a wrench to loosen the nuts on the water supply lines. Gently pull the lines away from the faucet. Keep a towel handy for any drips. Store the lines safely for reinstallation or replacement.

Credit: diy.stackexchange.com
Detach The Sink
Detaching the sink is a key step in removing your kitchen sink. This step frees the sink from the countertop and plumbing. It requires careful handling to avoid damage. Follow these simple tasks to detach the sink properly.
Loosen Mounting Clips
Look under the sink to find the mounting clips. These clips hold the sink tightly to the countertop. Use a screwdriver or a wrench to loosen each clip. Turn the screws or bolts counterclockwise. Keep loosening until the clips no longer hold the sink in place. Be patient and work slowly to prevent breaking the clips.
Cut Sealant Or Caulk
The sink edges usually have sealant or caulk. This material sticks the sink to the countertop. Use a utility knife or a putty knife to cut through the sealant. Run the blade carefully along the sink edge. Avoid scratching the countertop surface. Cut all around the sink to separate it fully. Once cut, gently lift the sink to detach it.
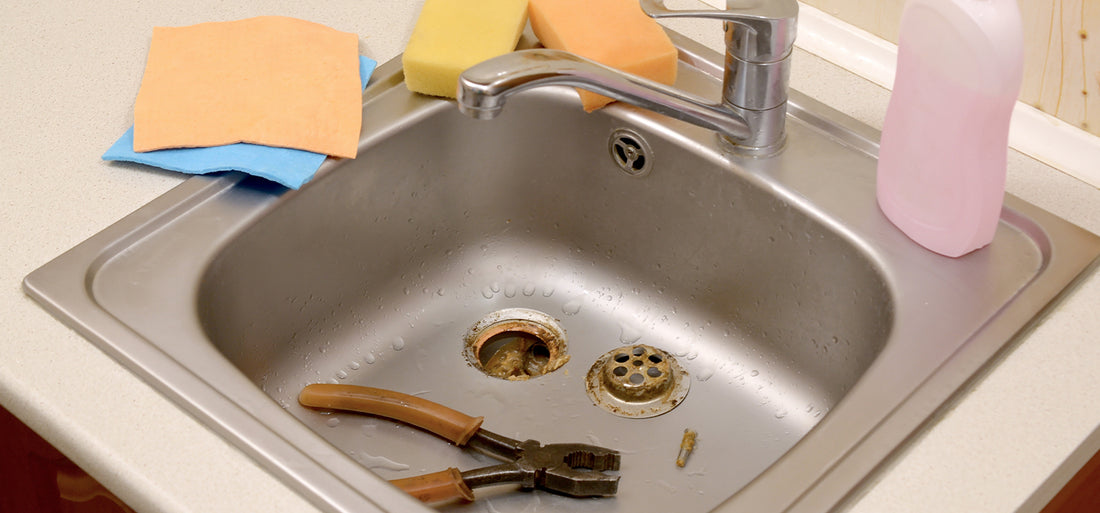
Remove The Sink
Removing the kitchen sink is an important step in many home projects. It allows you to replace or repair the sink and clean the area thoroughly. The process requires care to avoid damaging the countertop or plumbing. Follow these steps to remove the sink safely and prepare the space for the next work.
Lift The Sink Out
Start by loosening any clips or brackets holding the sink. Use a putty knife to cut through old sealant around the edges. Gently lift the sink from the countertop. Move slowly to avoid bending or cracking the sink. If stuck, check for hidden screws or adhesive. Have a helper support the sink if it is heavy.
Clean The Countertop
Remove all old putty and sealant from the countertop surface. Use a scraper or putty knife carefully. Clean the area with warm, soapy water to remove dirt and grease. Dry the surface completely before installing a new sink. A clean countertop helps create a strong seal for the new sink.
Credit: tapron.co.uk
Troubleshooting Tips
Removing a kitchen sink can bring up some common problems. These issues can slow down your work or cause damage. Knowing how to handle these problems helps you finish the job smoothly. Here are some key tips to help you solve common troubles during sink removal.
Dealing With Stubborn Pipes
Pipes often get stuck from years of use. Rust and buildup make them hard to move. Use a pipe wrench to get a better grip. Turn slowly to avoid breaking the pipe. Apply a lubricant like WD-40 on the joints. Let it sit for 10 minutes before trying again. Heat can also help loosen tight connections. Use a hairdryer to warm the pipe area carefully. Avoid using too much force to prevent damage.
Handling Rust Or Corrosion
Rust weakens metal parts and makes removal tricky. Use a wire brush to remove loose rust. Apply a rust remover product to dissolve tough spots. Let it work for the time shown on the label. Rinse the area with water and dry it well. For severe corrosion, gently tap around the joint with a hammer. This can help break the rust seal. Always wear gloves and eye protection when handling chemicals or rust.
Frequently Asked Questions
How Do I Disconnect Plumbing Before Removing A Sink?
Turn off the water supply first. Use a wrench to loosen water supply lines. Disconnect the drain trap and remove it carefully.
What Tools Are Needed To Remove A Kitchen Sink?
You’ll need an adjustable wrench, pliers, screwdriver, bucket, and utility knife. These tools help disconnect plumbing and cut sealants safely.
How To Safely Remove The Sink From The Countertop?
Cut the sealant around the sink with a utility knife. Loosen mounting clips under the sink. Lift the sink gently to avoid damage.
Can I Remove A Kitchen Sink Without Professional Help?
Yes, with proper tools and precautions, most sinks can be removed DIY. Follow steps carefully to avoid damaging pipes or countertops.
Conclusion
Removing a kitchen sink is easier than it seems. Follow each step with care and patience. Turn off the water and clear under the sink first. Use the right tools to loosen pipes and fasteners. Take your time to avoid damage or leaks.
Once removed, you can clean or replace the sink safely. This guide helps you handle the task yourself. Save money and learn a useful skill today. Ready to try it? You got this!