Are you struggling with a leaky or outdated kitchen sink faucet? Removing it might seem tricky, but you can do it yourself without calling a plumber.
In this guide, you’ll discover simple, step-by-step instructions to remove your kitchen faucet quickly and safely. By the end, you’ll feel confident tackling this task and ready to upgrade your kitchen with ease. Keep reading to learn the easy way to remove your kitchen sink faucet today!

Credit: www.reddit.com
Contents
Tools Needed
Removing a kitchen sink faucet needs some basic tools. Having the right tools makes the job simple and fast. Without them, the task can become frustrating and slow. Prepare your toolbox before starting. This saves time and avoids interruptions.
Each tool has a specific role. You will use them to loosen nuts, remove hoses, and protect your sink. Knowing these tools helps you work safely and efficiently.
Adjustable Wrench
An adjustable wrench fits many sizes of nuts and bolts. It helps loosen or tighten faucet connections. Its adjustable jaw makes it useful for various parts.
Basin Wrench
A basin wrench reaches tight spaces under the sink. It works well on nuts behind the sink basin. Its long handle and pivoting head make it easy to use.
Screwdriver
A screwdriver removes screws that hold the faucet in place. Both flathead and Phillips types are useful. Choose the correct tip for your screws.
Bucket
A bucket catches water from disconnected pipes. It keeps your area dry and clean. Place it under the sink before starting work.
Towel Or Rag
A towel or rag wipes spills and dries parts. It helps keep your workspace tidy. Use it to prevent water damage to cabinets.
Plumber’s Tape
Plumber’s tape seals threaded connections. It prevents leaks when reinstalling or replacing the faucet. Wrap it around threads before tightening.

Credit: diy.stackexchange.com
Prepare The Area
Preparing the area before removing your kitchen sink faucet makes the job easier and safer.
Take time to set up your workspace. This helps avoid damage and mess.
Turn Off Water Supply
Locate the water valves under the sink. Turn them clockwise to close.
Close both hot and cold water supplies. This stops water flow.
Open the faucet to release any leftover water in the pipes.
Clear The Sink Space
Remove all items around and under the sink. This gives you room to work.
Place a bucket or bowl under the pipes. It catches any dripping water.
Keep tools and parts nearby for easy access during removal.
Disconnect Water Lines
Disconnecting the water lines is a key step before removing your kitchen sink faucet. It stops water flow and prevents leaks during removal. Taking this step carefully protects your sink area from water damage.
Start by turning off the main water supply. Then prepare to loosen the connections attaching water lines to the faucet.
Loosen Supply Connections
Use an adjustable wrench to loosen the nuts on the water supply lines. Turn the wrench counterclockwise to loosen them. Hold the faucet connection steady to avoid damage. If the nuts are tight, try applying some penetrating oil first. Be gentle to prevent stripping the nuts or damaging pipes.
Drain Remaining Water
After loosening the connections, water may drip out. Place a small bucket or towel under the lines. Open the faucet to let any trapped water drain out. This step helps avoid spills and keeps your workspace dry.
Remove Old Faucet
Removing an old kitchen sink faucet is easier than it seems. It takes a few simple steps. First, you need to prepare the area under the sink. Clear out any items that block your access. Then, turn off the water supply to avoid spills. Use a towel to catch any remaining water in the pipes. These preparations make the removal smooth and clean.
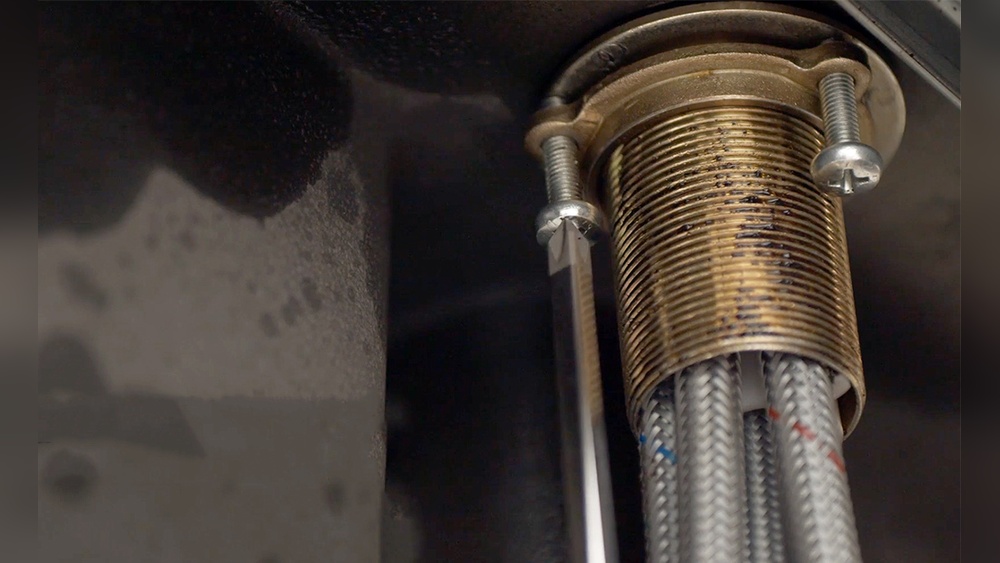
Access Mounting Nuts
Look under the sink to find the mounting nuts. They hold the faucet firmly in place. Use a flashlight to see clearly. Most nuts are metal and may be tight. A basin wrench works best to loosen them. Turn the wrench counterclockwise to unscrew the nuts. Sometimes, they need extra force. Take your time to avoid damage.
Lift Out Faucet
After removing the mounting nuts, lift the faucet gently. It should come free without much effort. If it sticks, wiggle it slightly side to side. Avoid pulling too hard to prevent damage. Clean the sink surface once the faucet is out. Remove old putty or sealant for a smooth finish. Now, the sink is ready for a new faucet.
Clean Sink Surface
Cleaning the sink surface is an important step before removing the kitchen sink faucet. Dirt, grime, and water spots can make the process harder. A clean surface helps you see what you are doing. It also protects the sink from scratches and damage during removal.
Take time to clean around the faucet base. This area often collects buildup. Cleaning here prevents debris from falling into the sink drain when you work.
Clear The Area Around The Faucet
Remove dishes, soap, and other items near the faucet. Wipe the sink dry with a cloth. This gives you space to work safely and keeps tools from slipping.
Use A Mild Cleaner
Apply a gentle cleaner to the sink surface. Avoid harsh chemicals that can damage the finish. A mix of warm water and dish soap works well. Scrub lightly with a sponge or soft cloth.
Rinse And Dry Thoroughly
Rinse the sink with clean water to remove all cleaner. Use a dry towel to wipe the surface dry. This prevents water spots and helps you spot any remaining dirt.
Install New Faucet
Installing a new kitchen sink faucet is a simple step after removing the old one. It refreshes your kitchen and improves water flow. Follow each step carefully for a secure and leak-free fit.
Position Faucet
Place the new faucet into the sink holes. Make sure it fits snugly and lines up well. Check the faucet handles and spout for proper position. Adjust as needed to avoid gaps or loose parts. This step ensures smooth operation.
Secure Mounting Hardware
Under the sink, attach the mounting hardware to hold the faucet tight. Hand-tighten the nuts first to keep the faucet steady. Use a wrench to secure them firmly, but avoid overtightening. Tight hardware prevents movement and leaks. Double-check all parts for security before finishing.
Reconnect Water Lines
Reconnecting the water lines is an important step after removing your kitchen sink faucet. It ensures water flows properly and prevents leaks. Careful reconnection keeps your kitchen safe and functional. Follow simple steps to connect the water supply lines correctly.
Turn Off The Main Water Supply
First, shut off the main water valve. This stops water flow and avoids spills. Double-check by turning on the faucet to see no water comes out.
Attach Water Lines To Faucet Inlets
Connect the hot and cold water lines to the faucet’s matching inlets. Hand-tighten the fittings first. Use a wrench for a snug fit, but do not overtighten.
Check For Washer Or O-ring Placement
Inspect washers or O-rings before connecting. These small parts stop leaks. Replace damaged washers to ensure a tight seal.
Secure Connections With A Wrench
Use an adjustable wrench to tighten connections gently. Avoid using too much force, which can damage fittings. A firm, but careful twist works best.
Turn On Water Supply And Test
Slowly turn on the main water valve. Watch for leaks at all connection points. Tighten any loose fittings if you see drips.
Test For Leaks
Testing for leaks is a key step after installing or removing a kitchen sink faucet. It ensures the water flows correctly and no water escapes from connections. A leak can cause water damage and waste water. Checking early helps fix problems fast.
Turn on the water supply slowly and watch all faucet parts. Pay close attention to joints and seals. Look for any water drops or wet spots. Keep the faucet running for a few minutes to see if leaks appear.
Prepare The Area Around The Sink
Clear the cabinet under the sink. Place a dry towel or container below the faucet pipes. This catches any small drips. Good lighting helps spot leaks more easily.
Turn On Both Hot And Cold Water
Open both hot and cold water valves. Let water run through the faucet at full pressure. Watch carefully where the water flows out and around the faucet base. Check the supply lines under the sink too.
Inspect Faucet Connections
Check where the faucet meets the sink surface. Look at the water supply hoses and connectors. Tighten any loose nuts with a wrench but do not overtighten. Small leaks often come from loose fittings.
Use A Dry Tissue To Detect Small Leaks
Run a dry tissue or paper towel along the faucet base and pipe joints. The tissue will show moisture even if drops are small. This method is simple and effective for spotting leaks early.

Credit: www.youtube.com
Frequently Asked Questions
How Do I Safely Remove A Kitchen Sink Faucet?
Turn off the water supply first. Disconnect water lines using a wrench. Unscrew mounting nuts under the sink. Lift the faucet out gently. Wear gloves to protect your hands during removal.
What Tools Are Needed To Remove A Sink Faucet?
You need an adjustable wrench, basin wrench, and screwdriver. A bucket helps catch water drips. Flashlight can assist in tight spaces. These tools make faucet removal easier and safer.
How Long Does It Take To Remove A Kitchen Faucet?
Removing a faucet typically takes 20 to 30 minutes. Time varies by faucet type and plumbing complexity. Proper preparation speeds up the process. Take your time to avoid damage.
Can I Remove The Faucet Without Shutting Off Water?
No, always shut off the water supply first. This prevents leaks and water damage. Locate the shutoff valves under the sink or turn off the main water line.
Conclusion
Removing a kitchen sink faucet is easier than it seems. Follow each step with care and patience. Turn off the water supply before starting. Use the right tools for a smooth process. Take your time to avoid damaging parts. Once done, check for leaks and proper fit.
This task saves money and builds confidence. Try it yourself and enjoy a fresh faucet. Simple steps lead to great results every time.