Is your kitchen sink strainer basket clogged, damaged, or just not working as it used to? Replacing it might seem tricky, but you can do it yourself quickly and without special tools.
Imagine how satisfying it will feel to fix this common kitchen problem on your own. In this guide, you’ll discover easy, step-by-step instructions that anyone can follow. Keep reading, and you’ll have your sink working smoothly again in no time!

Credit: www.aresheng.com.tw
Contents
Tools And Materials Needed
Replacing a kitchen sink strainer basket needs some specific tools and materials. Having the right items ready makes the job easier and faster. This section lists the essential tools and tips for choosing the correct strainer basket. Keep everything handy before starting the replacement process.
Essential Tools
First, gather a pair of adjustable pliers for gripping and loosening nuts. A plumber’s putty or silicone sealant will help create a watertight seal. You will need a bucket to catch any water that spills during removal. A screwdriver can help remove mounting screws if present. Also, have a clean cloth to wipe off excess putty or water. These tools cover most tasks in replacing the strainer basket.
Choosing The Right Strainer Basket
Pick a strainer basket that fits your sink drain size precisely. Most kitchen sinks use a standard 3.5-inch drain opening. Check the depth and width of the new basket to match the old one. Consider the material; stainless steel offers durability and rust resistance. Plastic baskets might be cheaper, but they ear out faster. A good fit prevents leaks and ensures smooth drainage.
Preparing The Workspace
Preparing the workspace is the first step to replacing your kitchen sink strainer basket safely and easily. A clean and organized area helps avoid accidents and makes the task quicker. Taking time to prepare prevents frustration and damage to your kitchen.
Before starting, gather all tools and materials nearby. This way, you won’t waste time searching during the job. Also, make sure the area is well-lit for clear visibility.
Clearing The Area
Remove all items from under the sink. Empty cabinets create space to work comfortably. Clear the countertop around the sink to avoid spills or drops. Wipe the area clean to prevent slipping or dirt from getting inside the plumbing.
Lay down a towel or small bucket to catch any water. This keeps your floor dry and safe. Organizing the space before you begin helps keep everything in order.
Turning Off the Water Supply
Locate the water valves under the sink. Usually, there are two valves: one for hot water and one for cold water. Turn both valves clockwise to shut off the water supply. This stops the water flow during the replacement.
Open the faucet to release any remaining water in the pipes. This prevents leaks and spills while removing the strainer basket. Check if the water is completely off before continuing.
Removing The Old Strainer Basket
Removing the old kitchen sink strainer basket is the first step in replacing it. This task requires care and the right tools. The process starts by disconnecting the drain pipe and then loosening the strainer itself. Taking these steps carefully prevents damage to your sink and plumbing.
Disconnecting The Drain Pipe
Begin by placing a bucket under the sink to catch any water. Use a wrench to loosen the slip nuts on the drain pipe. Turn the nuts counterclockwise to remove the pipe from the sink drain. Keep the pipe aside carefully to avoid spilling water. This clears the area so you can access the strainer basket easily.
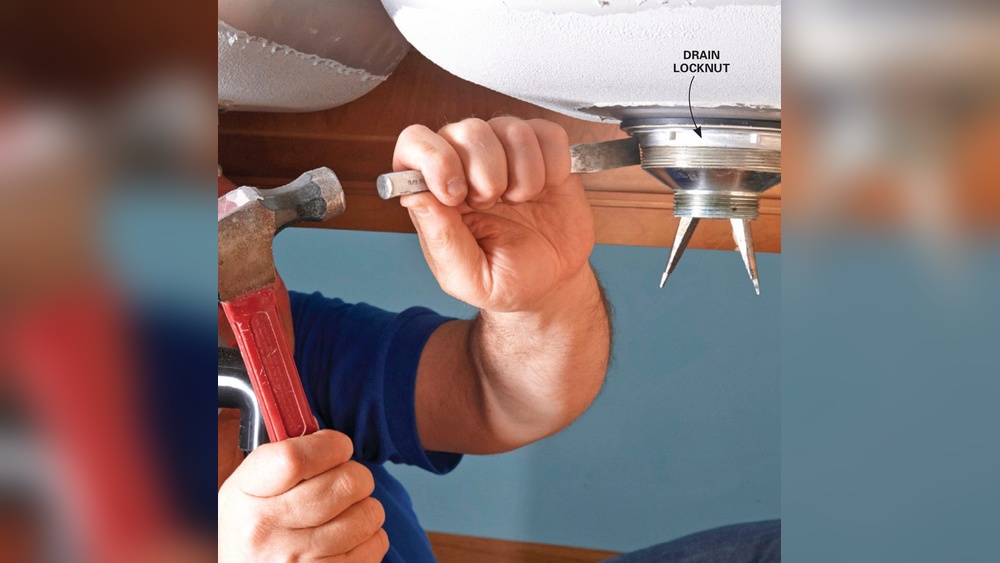
Loosening The Strainer
Look under the sink to find the locknut holding the strainer basket. Use pliers or a wrench to turn the locknut counterclockwise. This might require some force, especially if it has been in place for years. Once loose, lift the old strainer basket out from the top of the sink. Clean the sink drain opening before installing the new basket. This step ensures a good fit and prevents leaks.

Credit: www.youtube.com
Cleaning The Sink Drain
Cleaning the sink drain is an important step before replacing the kitchen sink strainer basket. A clean drain helps prevent clogs and keeps your kitchen smelling fresh. It also makes sure the new strainer basket fits well and works properly.
Removing Debris And Residue
Start by removing any food scraps or debris from the drain opening. Use gloves to pull out visible pieces carefully. Next, use a small brush or an old toothbrush to scrub the drain edges. This removes stuck-on residue and grease that can block the drain.
Pour hot water down the drain to loosen more buildup. For tough residue, a mix of baking soda and vinegar works well. Let it fizz for a few minutes, then flush again with hot water. This clears away grime and freshens the drain.
Inspecting For Damage
Look inside the drain for cracks or rust spots. These can cause leaks or bad smells later. Check the drain pipe and the surrounding area for any signs of wear. If you find damage, plan to fix it before installing the new basket.
Damaged parts might need replacing or sealing. A clean and intact drain ensures your kitchen sink works smoothly. Take time to inspect carefully before moving on.
Installing The New Strainer Basket
Installing the new strainer basket is a key step in replacing your kitchen sink strainer. This part stops food and debris from going down the drain. A good seal prevents leaks and keeps your sink working well.
Careful installation helps avoid water damage under your sink. Follow each step closely for the best results.
Applying Plumber’s Putty
Take a small amount of plumber’s putty. Roll it into a long, thin rope. Place this rope around the underside edge of the new strainer basket. This putty creates a tight seal between the sink and the strainer.
Press the strainer firmly into the sink drain hole. The putty should spread evenly to fill any gaps. Wipe away any extra putty that squeezes out. This keeps the area neat and clean.
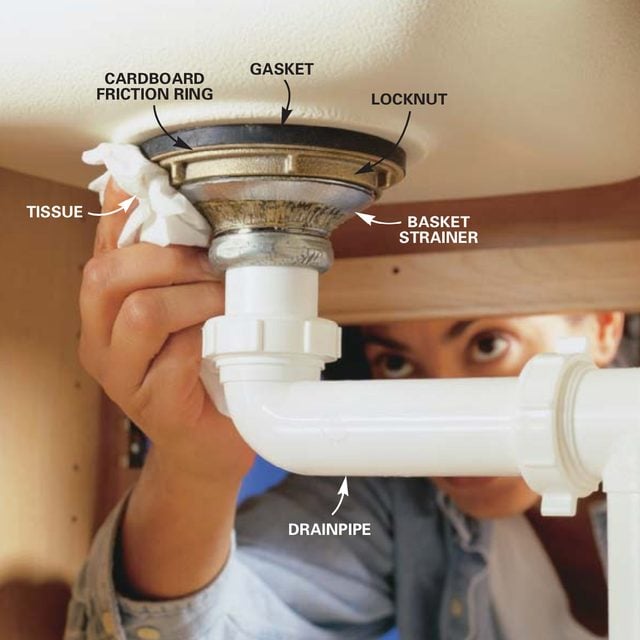
Securing The Strainer
From under the sink, slide the rubber gasket onto the strainer’s threaded section. Follow with the metal or plastic mounting nut. Tighten the nut by hand first, then use a wrench to secure it firmly.
Do not overtighten. Too much pressure can damage the sink or strainer. Check the strainer from above to ensure it sits evenly and does not move.
Reconnecting The Drain Pipe
Reconnecting the drain pipe is a key step after replacing your kitchen sink strainer basket. This step ensures water flows smoothly and prevents leaks under the sink. Take your time to secure all parts correctly.
Tightening Connections
Start by aligning the drain pipe with the strainer basket outlet. Hand-tighten the slip nut to hold the pipe in place. Use a wrench to gently tighten the nut further. Avoid over-tightening to prevent damage to the pipe or basket. Make sure the gasket stays in position for a good seal.
Checking For Leaks
Turn on the water and watch the connections closely. Look for any drips or moisture forming around joints. Tighten connections slightly if you notice small leaks. Run water for a few minutes to confirm there are no leaks. Fix any leaks before finishing the job to avoid water damage.
Testing The Installation
Testing the installation of your new kitchen sink strainer basket is important. It ensures the basket fits well and works correctly. This step helps avoid leaks and drainage problems later. Follow these simple checks to confirm everything is set up properly.
Running Water
Turn on the faucet and let water flow into the sink. Watch the strainer basket closely. Water should pass smoothly without pooling around the edges. Listen carefully for any dripping sounds under the sink. These could mean a loose seal or a bad fit. Keep the water running for a minute or two to be sure.
Inspecting For Proper Drainage
Check how quickly the water drains from the sink. It should flow down without delay or blockage. If water drains slowly, the strainer basket might be clogged or misaligned. Use a flashlight to look inside the drain for any visible issues. Clear any debris that might cause drainage problems. Proper drainage keeps your kitchen sink working well every day.
Tips For Maintenance
Maintaining your kitchen sink strainer basket helps it last longer and work better. Simple care keeps your sink clean and prevents damage. Follow these tips to keep your strainer basket in good shape.
Regular Cleaning
Clean the strainer basket every few days. Remove food scraps and rinse them with warm water. Use a soft brush to scrub away stuck debris. Avoid harsh chemicals that can damage the metal. Dry the basket to stop rust and stains.
Preventing Clogs
Stop large food pieces from going down the drain. Use the strainer basket to catch crumbs and bits. Pour hot water down the drain weekly to clear grease. Avoid pouring oil or fat into the sink. These steps reduce blockages and keep water flowing.
Credit: www.familyhandyman.com
Frequently Asked Questions
How Do I Remove A Kitchen Sink Strainer Basket?
First, loosen the locknut under the sink using a wrench. Then, unscrew and lift the old strainer basket from the sink drain. Use pliers if it’s stuck. Clean the area before installing the new basket to ensure a proper fit and seal.
What Tools Are Needed To Replace a Sink Strainer Basket?
You will need a wrench, pliers, plumber’s putty, and a screwdriver. A bucket helps catch water during removal. These tools make it easier to loosen nuts and seal the new strainer basket properly.
How Long Does It Take To Replace A Sink Strainer Basket?
Replacing a sink strainer basket typically takes 20 to 30 minutes. It depends on your plumbing skills and the sink’s condition. Being prepared with the right tools speeds up the process.
Can I Replace The Strainer Basket Without A Plumber?
Yes, you can replace it yourself with basic tools and instructions. Follow step-by-step guides carefully. Ensure the water supply is off before starting to avoid leaks or damage.
Conclusion
Replacing a kitchen sink strainer basket is easier than it seems. With basic tools and steps, anyone can do it. A new strainer basket keeps your sink clean and drains well. Take your time and follow the instructions carefully. This small repair can save you money and hassle later.
Keep your kitchen working smoothly with this simple fix. Give your sink a fresh start today!