Your kitchen sink cabinet is one of the most vulnerable spots in your home. Leaks, spills, and humidity can cause serious damage if you don’t protect it properly.
Imagine opening that cabinet and finding it dry, clean, and mold-free every time. Wouldn’t that give you peace of mind? In this guide, you’ll discover simple, effective ways to waterproof the cabinet under your kitchen sink. By the end, you’ll know exactly how to keep your cabinet safe and extend its life.
Let’s dive in and protect your kitchen from hidden water damage before it’s too late.
Contents
Assessing The Cabinet Condition
Before waterproofing the cabinet under your kitchen sink, you must assess its condition. This step helps you spot problems and plan the best way to protect the cabinet. Careful checking saves time and money later.
Check For Existing Damage
Look closely at the cabinet walls, floor, and corners. Notice any cracks, stains, or soft spots. These signs point to past water leaks or damage. Pay attention to mold or mildew, which shows moisture problems. Use a flashlight to see dark areas well. Early damage repair stops bigger problems.
Identify Moisture Sources
Find where the water comes from inside the cabinet. Check pipes, joints, and seals for leaks. Watch for dripping or pooling water. Look under the sink and around the drain. Sometimes water comes from spills or humid air. Pinpointing moisture sources helps target the waterproofing effort.

Credit: www.youtube.com
Gathering Waterproofing Materials
Gathering the right materials is the first step to waterproofing the cabinet under your kitchen sink. Having all the tools and products ready makes the job faster and easier. It also helps avoid mistakes that could cause leaks later. Prepare a clean workspace and check each item before starting.
Essential Tools
Start with basic tools to prepare and apply waterproofing materials. A utility knife helps trim old seals and damaged wood. A paintbrush or small roller spreads waterproof coatings evenly. Sandpaper smooths rough cabinet surfaces for better adhesion. A measuring tape ensures correct product amounts. Gloves protect your hands from chemicals. A clean cloth wipes surfaces before applying products.
Recommended Waterproofing Products
Choose products made for kitchen cabinets and moisture protection. Waterproof sealant or caulk blocks water from seams and corners. Waterproof paint or epoxy coats the cabinet interior to prevent water damage. Wood primer prepares surfaces for better waterproofing. Silicone sealant seals around pipes and fittings. Use mold-resistant products to keep the cabinet clean and safe. Always read product labels for suitability and application instructions.
Preparing The Cabinet Surface
Preparing the cabinet surface is an important step before waterproofing. A clean and dry surface helps the waterproofing materials stick better. It also stops water from seeping under old layers or dirt. Proper preparation saves time and prevents future damage.
Cleaning And Drying
Start by clearing out everything inside the cabinet. Use a vacuum or brush to remove dust and debris. Wipe the surfaces with a mild detergent and water. Rinse with clean water to remove soap residue. Let the cabinet dry completely for at least 24 hours. Moisture can stop sealants from sticking well.
Removing Old Sealants
Check for any old sealants or caulk around pipes or corners. Use a putty knife or scraper to remove them carefully. Avoid damaging the wood or paint underneath. Clean the area again to remove any leftover residue. This step ensures the new waterproof layer bonds properly.

Credit: www.walmart.com
Sealing Cabinet Joints And Corners
Sealing the joints and corners of your kitchen sink cabinet is key to preventing water damage. These spots often let water slip through, causing mold and wood damage. Proper sealing keeps moisture out and extends your cabinet’s life.
Use simple tools and materials to seal these areas well. Focus on every seam and corner where water might enter. Careful work here saves time and money later.
Applying Caulk
Caulk is a flexible sealant that blocks water from joints and cracks. Choose a waterproof caulk made for kitchens or bathrooms. Cut the tip of the tube at a 45-degree angle for better control.
Apply a steady bead of caulk along each joint and corner. Smooth it with a wet finger or a caulk tool for a neat finish. Let it dry fully before using the cabinet.
Using Waterproof Tape
Waterproof tape adds an extra layer of protection over sealed joints. It sticks firmly and blocks water from seeping in. Clean the surface before applying the tape for best adhesion.
Cut strips to fit each joint or corner. Press the tape down firmly to remove bubbles. Overlap the edges slightly to cover every gap completely.
Applying Waterproof Coatings
Applying waterproof coatings protects the cabinet under your kitchen sink from water damage. This step stops water from seeping into the wood or particle board. A good waterproof layer keeps the cabinet strong and dry for years.
Choose the right coating and apply it carefully. This process creates a seal that blocks moisture and prevents mold growth. It also makes cleaning easier and extends the life of your cabinet.
Choosing The Right Coating
Select a coating that suits the cabinet material. Common options include waterproof paint, sealants, and varnishes. Water-based sealants dry fast and have low odor. Oil-based coatings last longer but take more time to dry.
Look for products labeled “waterproof” or “water-resistant.” Choose a coating that resists mold and mildew. Consider non-toxic options if you want a safer kitchen environment. Check product reviews for durability and ease of use.
Step-by-step Application
Start by cleaning the cabinet surface thoroughly. Remove dirt, grease, and old paint. Sand rough spots to create a smooth base. Use a damp cloth to wipe away dust after sanding.
Apply the waterproof coating with a brush or roller. Spread the coating evenly in thin layers. Allow the first coat to dry completely before adding more. Two to three coats usually provide good protection.
Seal all corners and edges carefully. These areas are most vulnerable to water damage. Let the final coat cure for the time recommended on the label. Avoid heavy use of the cabinet until the coating sets fully.
Protecting The Cabinet Base
The cabinet base under your kitchen sink often faces water spills and leaks. Protecting this base is important to avoid damage and mold. Water can cause wood to swell and weaken the cabinet structure. Taking simple steps to waterproof the base keeps your cabinet strong and clean.
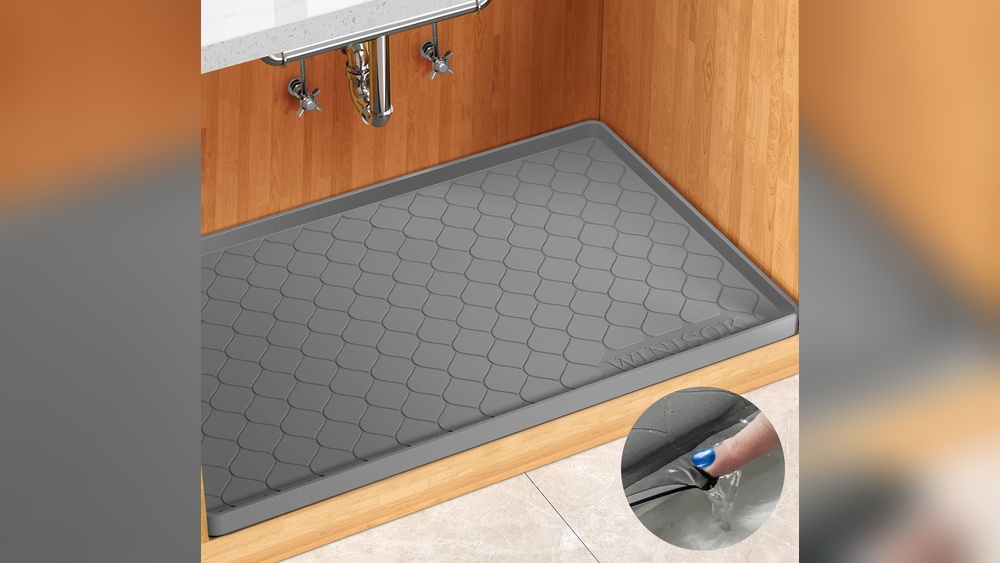
Installing A Waterproof Mat
Place a waterproof mat on the cabinet floor. These mats block water from touching the wood. They are easy to cut and fit any cabinet size. Choose mats made of rubber or vinyl for the best protection. Clean the mat regularly to prevent mold growth. A waterproof mat acts as a barrier against spills and leaks.
Using Plastic Liners
Plastic liners provide another layer of defense. Line the entire cabinet base with a thick plastic sheet. Tape the edges to keep the liner in place. Liners stop water from seeping into the wood below. They are inexpensive and simple to install. Replace liners if they tear or wear out to maintain protection.
Maintaining Waterproofing Efforts
Keeping the cabinet under your kitchen sink waterproof takes ongoing effort. Protecting it from water damage means staying alert and acting fast. Small leaks can cause big problems over time. Regular care helps keep your cabinet dry and strong.
Regular Inspections
Check your cabinet often for signs of water damage. Look for soft spots, stains, or mold. Smell for musty odors that might mean hidden moisture. Inspect pipes and seals for drips or corrosion. A careful look every few weeks can catch problems early.
Addressing Leaks Promptly
Fix leaks as soon as you see them. Even tiny drips can lead to serious damage. Tighten loose connections and replace worn parts. Use waterproof sealant on any gaps or cracks. Quick action stops water from soaking into the cabinet wood.

Credit: www.amazon.com
Frequently Asked Questions
How Do I Start Waterproofing Under My Kitchen Sink?
Begin by cleaning the cabinet thoroughly. Remove all items and dry any moisture. Apply a waterproof sealant to the base and sides before reinstalling items.
What Materials Are Best For Waterproofing Kitchen Cabinets?
Use waterproof sealants, silicone caulk, and waterproof paint. Consider liners or mats made from rubber or plastic for extra protection.
Can I Prevent Mold When Waterproofing Under The Sink?
Yes. Ensure the area is dry before sealing. Use mold-resistant sealants and improve ventilation to prevent mold growth.
How Often Should I Waterproof The Cabinet Under The Sink?
Reapply waterproofing every 1-2 years or after any leaks. Regular inspections help maintain protection and catch damage early.
Conclusion
Waterproofing the cabinet under your kitchen sink protects it from water damage. It helps keep your kitchen clean and dry. Small steps like sealing edges and using waterproof paint make a big difference. Regular checks prevent leaks and costly repairs later.
A dry cabinet also stops mold and bad smells. Take time to do this right. Your efforts will save money and stress. Keep your kitchen sink area safe and strong for years. Simple care goes a long way.