Is your kitchen sink leaking and driving you crazy? That constant drip-drip sound isn’t just annoying—it can waste water, increase your bills, and even cause damage to your cabinets.
You don’t have to live with that leak or call a plumber right away. You’ll discover simple, effective steps to stop your kitchen sink leak quickly. Keep reading, and you’ll save money, protect your home, and get your sink working perfectly again in no time.

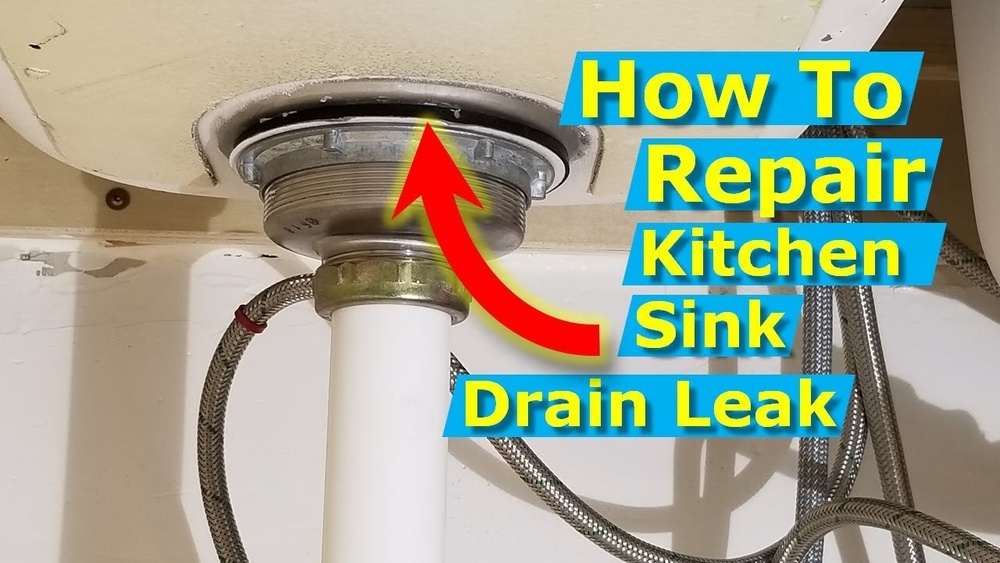
Credit: www.youtube.com
Contents
Identify Leak Sources
Finding the source of a kitchen sink leak is the first step to stopping it. A small drip can cause big water damage over time. Checking the right parts helps fix the problem quickly. This saves water and keeps your home safe.
Check Faucet Connections
Look under the sink at the faucet connections. These joints often loosen and cause leaks. Tighten any loose nuts with a wrench. Watch for cracks or worn washers. Replace parts that look damaged or old.
Inspect Drain Pipes
Drain pipes carry water away from your sink. Check for cracks or holes along the pipes. Look at the joints where pipes connect. Water can leak from loose or broken seals. Use plumber’s tape or replace faulty parts to stop leaks.
Examine Water Supply Lines
Water supply lines bring water to your faucet. Check these lines for drips or wet spots. Hoses can crack or loosen over time. Tighten connections and replace worn hoses. This stops leaks and prevents water waste.
Credit: www.snappyservices.com
Gather Tools And Materials
Before fixing a kitchen sink leak, gather all the tools and materials. Being prepared saves time and avoids frustration. Having the right items makes repairs easier and faster.
Essential Repair Tools
Start with a wrench set to loosen nuts and bolts. A plumber’s tape prevents leaks at pipe joints. Use a bucket to catch dripping water. A screwdriver helps remove faucet handles. A flashlight reveals hard-to-see areas under the sink. Finally, have some old towels ready to clean spills.
Recommended Replacement Parts
Common parts to replace include washers and O-rings. These small parts often cause leaks. Faucet cartridges sometimes need changing for a tight seal. Supply lines can wear out and leak. Keep extra pipe connectors handy for secure fittings. Having these parts ready speeds up the repair process.
Fix Loose Faucet Parts
Fixing loose faucet parts is a smart step to stop a kitchen sink leak. Loose parts often cause water drips and waste. Tightening or replacing these parts can save water and money. It also keeps your sink working well for a long time.
Tighten Faucet Handles
Start by checking the faucet handles. Use a screwdriver or wrench to tighten loose screws. Tight handles stop leaks and improve faucet control. Avoid overtightening to prevent damage to parts. Tight handles make your sink feel sturdy and reliable.
Replace Worn Washers
Worn washers cause leaks inside the faucet. Turn off the water supply before removing the faucet handle. Take out the old washer and replace it with a new one. New washers create a tight seal to stop drips. This simple fix helps your faucet work smoothly again.
Seal Drain Pipe Joints
Sealing the drain pipe joints is key to stopping kitchen sink leaks. These joints often loosen or wear out over time. Water can escape through tiny gaps, causing damage under your sink. Proper sealing keeps pipes tight and leak-free. It also prevents mold and bad smells.
Two common ways to seal pipe joints are using plumber’s tape and pipe sealant. Both are easy to apply and very effective. Let’s look at how to use each method correctly.
Apply Plumber’s Tape
Plumber’s tape, also called Teflon tape, wraps around pipe threads. It fills small gaps and stops water from leaking. Start by cleaning the pipe threads well. Wrap the tape clockwise around the threads three to five times. Press the tape firmly to make it stick.
After wrapping, screw the pipe parts back together tightly. The tape creates a tight seal that blocks leaks. It also makes unscrewing easier later. Use plumber’s tape on all threaded joints under your sink.
Use Pipe Sealant
Pipe sealant is a paste that seals joints and stops leaks. It works well on both threaded and slip joints. Clean the pipe surface before applying sealant. Use a brush or your finger to spread a thin layer evenly.
Join the pipes while the sealant is still wet. Tighten the joint firmly. The sealant dries and hardens, creating a strong, waterproof seal. Avoid using too much to prevent a mess. Pipe sealant lasts longer and works well in wet areas.
Repair Water Supply Lines
Repairing water supply lines is key to stopping a kitchen sink leak. These lines bring water to your faucet. Over time, they can wear out or get loose. Fixing them can stop leaks and save water. It also prevents damage to your cabinets and floor.
Replace Damaged Hoses
Check the hoses connected to your sink. Look for cracks, bulges, or rust. These signs mean the hose needs replacement. Turn off the water supply before removing old hoses. Use new, flexible hoses made of braided stainless steel. They last longer and resist leaks. Tighten the new hoses securely but avoid over-tightening. Replace hoses every 5 years or sooner if damaged.
Secure Connection Nuts
Connection nuts hold hoses to pipes and faucets. They can loosen over time and cause leaks. Use a wrench to tighten these nuts carefully. Do not force them too tightly to avoid damage. Check for washers inside the nuts. Replace old or cracked washers for a better seal. Tight connections stop water from dripping out.
Prevent Future Leaks
Stopping a kitchen sink leak is just the first step. Preventing future leaks saves time, money, and stress. Taking care of your sink regularly helps keep pipes and fixtures strong. Small actions every month can stop big problems later. Focus on simple habits and know when to ask for help.
Regular Maintenance Tips
Check under the sink for drips or wet spots often. Tighten loose fittings with a wrench carefully. Clean faucet aerators to remove dirt and build-up. Replace worn-out washers and seals quickly. Avoid pouring grease or thick liquids down the drain. Use strainers to catch food and debris. Run water at full flow to clear pipes. Watch for slow drainage as it signals trouble early.
When To Call A Professional
Persistent leaks need expert attention. Strange noises or smells from pipes require a plumber. Major water stains or mold growth call for immediate help. If tightening or cleaning does not stop leaks, call a pro. Complex pipe layouts or old plumbing benefit from inspection. Professionals have tools to fix hidden or tough leaks. Early professional help prevents costly damage.
Frequently Asked Questions
How Do I Identify A Kitchen Sink Leak?
Look for water stains, puddles, or dampness under the sink. Check for dripping sounds or mold growth. Inspect pipes and faucet connections carefully for visible leaks.
What Causes Kitchen Sink Leaks Most Often?
Common causes include worn-out washers, loose connections, corroded pipes, and damaged seals. Regular wear and tear or high water pressure can also cause leaks.
Can I Fix A Kitchen Sink Leak Myself?
Yes, minor leaks can be fixed with basic tools. Turn off the water, tighten connections, replace washers, or apply plumber’s tape. For complex leaks, call a professional plumber.
How Can I Prevent Future Kitchen Sink Leaks?
Regularly inspect pipes and connections. Avoid harsh chemicals and prevent clogs by not pouring grease down the drain. Schedule routine maintenance to catch issues early.
Conclusion
Fixing a kitchen sink leak saves water and money. Small leaks can cause big damage over time. Act quickly to stop drips and puddles. Check seals, pipes, and connectors regularly. Tighten loose parts or replace worn-out washers. Use basic tools to handle simple repairs.
If problems persist, call a plumber for help. Keep your kitchen dry and safe every day. A little care now avoids costly repairs later. Simple steps make your sink work like new.